
These days, everyone has been getting a tremendous amount of home time because of the coronavirus. I am no different. While others are complaining about home prison, I think this is the perfect time to reprioritize some of the house choirs that I’ve been putting off for a long time.
One of them is to set up my home server.
Table of Contents
Built From A Decade Ago
I had an HTPC in the past that uses an HDMI cable to directly connect to the TV. I built this near 2010 and installed XBMC (now KODI), one of the first apps for providing a beautiful 10-foot interface to access my movies and TV shows. After years ago, I got a new Samsung TV. The new TV didn’t play nice with the HTPC and the PC was having trouble detecting the TV at boot. It was also experiencing random hangs, showing it’s age. Besides, this decade-old HTPC, albeit beautiful, was also too big to fit in my new TV cabinet.

Beautiful SilverStone GD04s - a bit big for today’s HTPC standards
Instead, I ended up installing Plex Media Server on my desktop PC and streamed to the Plex app on my Samsung TV. While this worked, my PC (Dell T1700) was using too much power to leave on 24/7, not exactly achieving “entertainment-on-demand”.
After pondering on several purchasing options that ranged from SFF PCs to the Raspberry Pi, I decided to repurpose the old laptops that I have lying around.
“It always starts with Plex.”
After installing a bunch of apps on top of Elementary OS 5.1 Hera on an old IBM ThinkPad X1 Carbon Gen 1, it started to hang. I think I was probably throwing too much at the 4GB of RAM and the i5-3337U that it had.
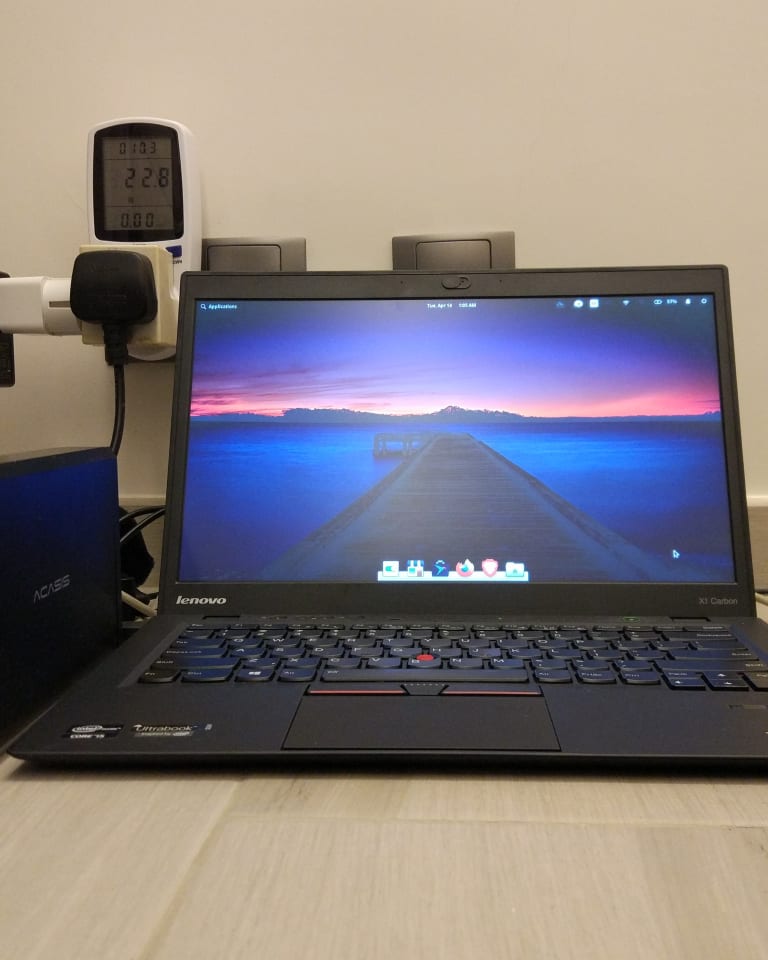
ThinkPad with Elementary OS 5.1 Hera and a USB HDD
So I moved everything installed already to the other old laptop, a Lenovo IdeaPad U330 Touch equipped with 8GB of ram and an i5-4200U, and Ubuntu Budgie 19.10. This was super easy and quick thanks to docker (more about it below). Although the system was running smoother, I was getting port clashes between different apps. In the end, I decided to use both of my laptops.
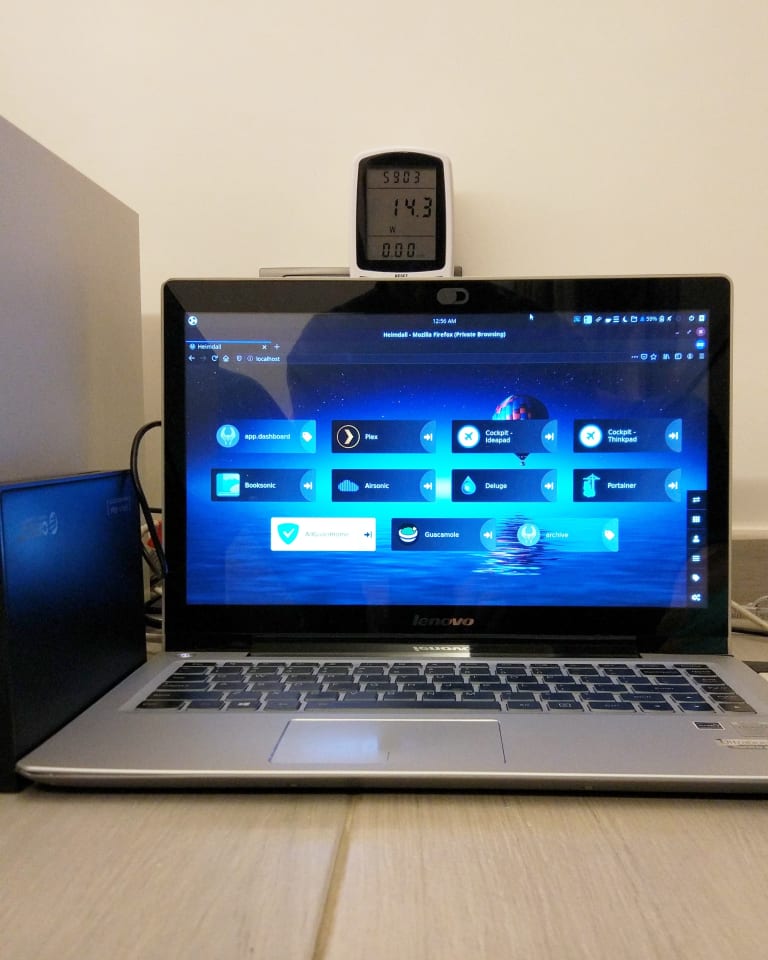
IdeaPad with Ubuntu Budgie 19.10 and a USB HDD
Wait… a laptop as a server?
Some of you might be wondering why I am using a laptop as a server.
I know this might sound counterintuitive at first, but I think for many people’s home servers, old laptops makes a great choice because:
- they are built to be small and quiet
- they are built to be very energy efficient and still more powerful than a Raspberry Pi
- they have a built-in monitor which makes it easy to set up and work with compared with a headless machine
- they have a built-in battery and WIFI which makes them portable so they can be moved around the house if needed
- they are lying around and are also free
- it is good for the environment to repurpose hardware and generate less e-waste
I am a big fan of reusing old hardware and for this project, I won’t be buying anything new.
Storage
This server’s current main purpose is to serve media 24/7. My media collection is small at around 2TB, limited by the drives available.
There are 2 drives:
- 2TB 3.5” SATA drive inside a USB external case connected to the IdeaPad
- 60GB 3.5” PATA drive (it was lying around!) inside a USB external case connected to the ThinkPad
Both drives are packed to the brim and I’ll be adding more drives to the system soon.
Backup
I put all the application states and configs on the external drives. This way I can move the external drive to any computer and run the apps there, thereby making the apps and the machine that runs them completely decoupled. The application states and configs are backed up regularly to the laptop’s hard drive, so I can refer to them in case something happens to the drives.
Besides, I check in the Docker Compose file to GitHub to better track the changes that I make.
The more important media files are synced to the cloud. Since I wouldn’t be too sad if the data on these drives suddenly disappeared, the current setup is sufficient.
Power
Having a power-efficient system is one of the most important aspects of building this server. In considering the laptops against a Raspberry Pi, I want to ensure the laptops are energy efficient enough, given the computing power they provide, to justify their increased power usage. Since I currently have very minimal application requirements, a Raspberry Pi 4 is probably sufficient to meet all my needs.
From the pictures of the laptops, you can see that I measured the wattage the laptops are using with a power meter. I made some rough estimation and this is what I found:
| System | Idle (Watts) | Load (Watts) | Annual Costs (US$) [4][5] |
|---|---|---|---|
| IdeaPad + 1 SATA USB HDD [1] | 14 - 25 | 28 - 38 | 15-25 |
| ThinkPad + 1 PATA USB HDD [2] | 18 - 28 | 33 - 40 | 18-28 |
| Raspberry Pi 4b [3] + 1 SATA USB HDD | 8 - 13 | 8 - 13 | 8-8 |
| Desktop PC | 65 - 80 | 80 - 120 | 56-69 |
[1] SATA USB HDD uses about 5-10V at idle and under load
[2] PATA USB HDD uses about 8-14V at idle and under load
[3]source - I used the numbers from “Idling” and “Watching a 1080p video on the µSD card with omxplayer”
[4] Lower end is the average of Idle, upper end is the average of Load
[5] Cost of electricity at 24 hours a day is around US$0.77 per watt per year
A large inefficiency in the setup is due to the old USB drives, and they will be the next items for me to replace. The laptops themselves are quite power-efficient, especially when their screens are off. Another advantage with the laptops is they have a lot of room to accommodate more apps down the road than the Raspberry Pi.
App Organization
Here’s what I installed:
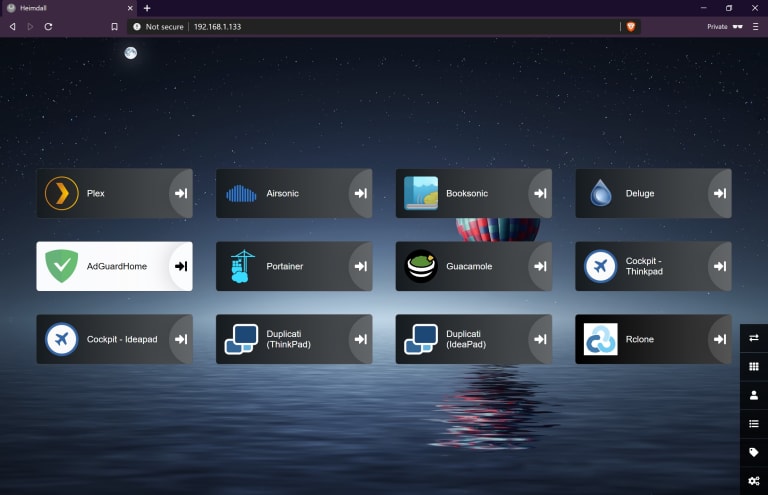
Heimdall - links to all the apps installed
The apps are separated into two groups, ones that need direct access to the internet, and ones that are behind NordVPN, my preferred method of accessing the internet.
Apps Behind VPN
Dashboard
- Heimdall - the dashboard app that you see which makes it easy to navigate to all the apps without memorizing all their different port number. Yes it’s just a glorified bookmark manager, but it’s a cool looking one nonetheless
Media
- Plex - media server that can stream and transcode movies, TV shows & music to any devices that Plex has a client app, including Windows, Macs, Android, iOS, even TVs. It can also play on web browsers and support DLNA. I don’t access my media outside of the home but I can easily give Plex direct internet access if I do
- Airsonic - a server that streams music to any subsonic compatible clients
- Booksonic - a fork of Airsonic that specifically targets audiobooks
- Deluge - torrent downloader
Administration
- Portainer - a GUI for managing docker containers. Although I mainly use CLI (mainly docker-compose), it’s nice to click on a GUI now and then
- Cockpit - a dashboard for monitoring the statistics and status of the laptops. It uses the OS’s logins and even has a terminal. Zero configuration required. After using other resource monitoring apps such as Stacer and htop, I can’t recommend Cockpit high enough
- Guacamole - a remote desktop gateway that supports RDP (for Windows) and VNC (Linux)
- Duplicati - a block-level incremental backup application that is used for backing up the application configs and states from the external USB HDD to the laptop SSD
- Rclone - a file synchronization application that supports 50+ cloud storage providers. This helps sync some of my media with the cloud, acting as a “pseudo-backup” and also allows me to access my media in case I can’t access my server
Apps With Direct Internet Access
Networking
- DuckDNS - an app that updates the ever-changing IP address that ISP gives us to the dynamic DNS registry, Duck DNS, which gives us a free XXXXX.duckdns.org domain name that points it back to our IP. This simple app has no GUI
- AdGuard Home - a network-wide ad-blocker that creates a DNS sinkhole for blocking ads on devices connected to your LAN
- WireGuard - a VPN server for accessing my network away from home (more on this below). I haven’t found a nice web GUI so it’s not on Heimdall at the moment
External Access
I used to just do simple port forwards on my router for apps that I need access to when I’m on the road. That includes port 80 for a test webserver, 22 for SSH, 3389 for RDP, and the list goes on.
But one day I started to log the login attempts at these ports, and I saw first hand how frequently they were being attacked. I suggest you try this, or set up a honeypot, and see for yourself. Sit back and have a towel ready to wipe your sweat.
So for this new server, I want it to be a bit more secure. I tried two methods, reverse proxy and VPN.
Reverse Proxy
A reverse proxy is the first thing I tried. Perhaps due to my docker setup is a little bit more specific (I use docker-compose and have 2 docker projects in separate networks), I spent a long time getting Traefik to work with each app (their v2 is lacking in terms of documentation, so much for touting a zero-config setup). Then I started to wonder if there’s a better way.
In addition to the webserver, an SSL certificate is also needed for the ”s” in https to work. Let’s Encrypt has made free and super easy. Using this docker image will also give you Nginx for free.
But rather than going through the whole setup again, that’s when I decide to do away with the open https port on my router. I can save this port for running a website. Besides, a reverse proxy isn’t originally meant for secured external access anyways.
Wireguard
Wireguard has been getting a lot of attention recently and it is looking likely to go mainstream in the coming years. It is an alternative to open-source VPN solutions such as OpenVPN and ZeroTier. Its main selling point is that it uses updated cryptography with a simple design and implementation of only 4000 lines of code, reducing the attack surface.
Setting it up was unimaginably simple. Install the package, generate the key pairs, setup the IP addresses, repeat for each client, and you’re done. Compare to getting all the paths right for a reverse proxy, this is incredible (albeit the two aren’t equal, but for the current purpose of providing external access, it is).
Things I Learned
Docker Compose
Docker has made putting this server together so much cleaner. With Docker Compose, spinning up a new service is simply editing the docker-compose config YAML file, and calling docker-compose up -d. All the configs and application states are saved in volumes that are mapped to a local folder. To move the app to another machine, you just need to move the local folders and call docker-compose up -d on the new machine. Did I mention many docker images have support for multiple CPU architectures? So not only are these docker images are cross-OS (works on Windows, Linux, Mac), but will also work on ARM devices like Raspberry Pi, as well as your PC.
While building this server, I always choose to install the docker version of an app first. LinuxServer.io has a repository of docker images on Docker Hub that they actively maintain.
Network-Wide Ad-Blocker Are Awesome
I have been aware of Pi-Hole for a while and one motivation for setting up this server is to try running it. Initially, I installed it on the laptop with NordVPN and realized Pi-Hole doesn’t work well when the VPN is enabled.
I then installed it on the other laptop with direct internet access and although it worked, I couldn’t cleanly change the port of the web interface which defaults to 80. This means that the Pi-hole interface is exposed when I configure it behind the reverse proxy. Not exactly a safe practice. This was one of the main reasons why I picked a VPN solution instead.
Upon finally getting the ad-blocker installed, the biggest difference I noticed was on my phone and my TV. Some ads that normally show up in apps have disappeared. I can have AdGuard Home block more ads by adding more domains to the filter list. Adguard Home also has a nice looking interface that shows me the DNS queries made by the device.
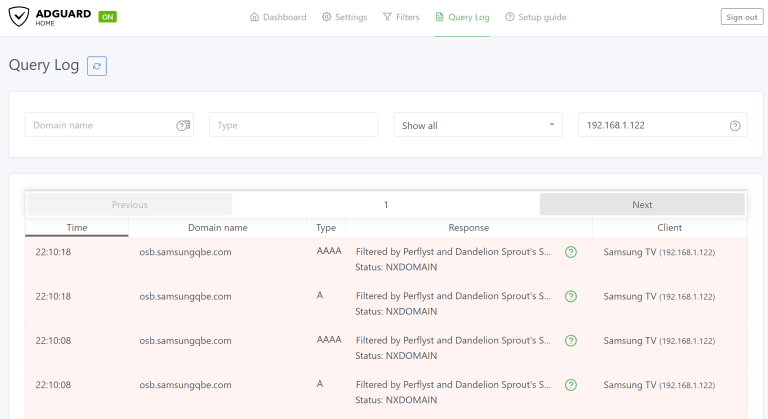
Adguard Home
Besides ads, the other concern I had was to stop Samsung from tracking my watching habit. And you can see from the screenshot that this has worked nicely.
Networking
While I have no problems setting up a simple home WIFI network with routers and access points, this is the first time I set up a reverse proxy, VPN server, DNS proxy (network-wide ad blocker) and Samba file sharing. As a developer, I always find networking to be a bit too finicky, where things wouldn’t work for no apparent reasons (at least with my networking debugging skills). I had a similar experience when working on this project, but I think I’ve picked up some valuable debugging skills to solve networking problems a bit quicker (though I still standby rebooting a device when not able to connect as the first option ![]() ).
).
Deeper Understanding of Ubuntu
I brought this mess to myself. Rather than installing the same OS, I had the idea of trying different flavours of Ubuntu a while ago. Although they’re both Ubuntu-based and works similarly on day-to-day usage, the subtle differences still tripped me up when getting into the nitty-gritty.
Also, some of the most time-consuming things on this project were not due to the apps installations and configurations, but to the laptops themselves.
1 - Screen Sharing with VNC
I want to reboot and login to the laptop completely from remote, and to share the GUI on the laptop rather than create a new GUI session when connecting through VNC. It turns out this was not easy with some of the VNC servers that I used before (namely TightVNC and TigerVNC). What worked at the end was the Ubuntu built-in x11vnc that allows me to boot straight to the greeter to login and share the screen.
2 - Power Management in Linux
While power management was easy to configure for both laptops in Windows mode, it wasn’t so smooth on Linux. I needed my laptops to never go into Suspend Mode and to keep on running even when the lid is closed. Unfortunately having these settings set in the GUI didn’t work. What I found at the end was to use this command:
sudo systemctl mask sleep.target suspend.target hibernate.target hybrid-sleep.target
To prevent the laptop from suspending when the lid is closed, you just need to add this line to /etc/UPower/UPower.conf:
IgnoreLid=true
I guess these problems are a fair price to pay for building the server on free hardware.
Summary
Overall this project took 1-2 weeks of a good few solid hours every day, way more time than it should have. But I was tinkering and trying new things. There are occasions that I have completely wasted my time on. For example, I installed Pi-Hole on 3 different devices and ended up using AdGuard Home instead. Thank goodness AdGuard Home had a much simpler setup procedure as I was getting so tired of tinkering with adblockers at the end.
A big chunk of the time was spent pouring through articles, reviews and forums on finding the most suitable setup. It was also probably one of the most fun I’ve had since the lockdown as building the server piece by piece and seeing it all working together at the end is satisfying.
Future Ideas
There are still a few ideas that are on my mind which I want to try:
Proxmox VE
I would like to reinstall everything under Proxmox VE, a virtual machine hypervisor, so that I can put some of the apps in their own VMs. This will help eliminate some of the problems like port clashes and also help me better manage the machine’s resources. Though my IdeaPad only has 8GB of RAM so I’m not sure how many VMs it can handle.
File System With Spanning & Recovery
Instead of the current JBOD setup, I intend to add pooling and parity recovery to recover from disk failures. Right now I’m leaning towards MergerFS + SnapRAID.